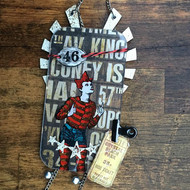
Acrylic Circus Tag
Posted by DecoArt on Feb 15th 2017
I love crafting with acrylic, It can add depth and dimension to a craft project and provides a different tactile feel to things like tags and ATC’s.
I’m sharing how I like to paint on acrylic today with a vintage circus tag.
Items Needed:
- Tando Creative - Andy Skinner Industrial Wings
- Acrylic Media Board
- Stampendous Aged Ivory Embossing Enamel
- Stazon Black Ink Pad
- VersaMark Embossing Pad
- Carabelle Studio: Clown Stamp, Stars
- Assorted Brushes
- Design Paper
- Metal Chain
- Embellishments
- Small Sanding Block
- DecoArt One Step Crackle
- Super Glue
Instructions:
Gather your supplies.
The Tando-Creative acrylic media boards come with a protective film on each side to help protect the surface from getting scratched, peel off one side, this is the side you will be working on. Leave the film on the other side for now to help protect the board whilst you work on it.
Stamp your image using Stazon ink. Try and stamp the acrylic using a very vertical up down stamping motion to avoid any smudging. If it does smudge, just use some of the Stazon remover, wipe it clean and start again.
Using a fine detail brush start to paint the stamped image. You will be painting on top of the stamped image, this will be the back of the tag so you don’t need to worry about painting on top of the inked lines, if you go over the lines you can leave it to dry and gently scratch the paint off.
I load the brush up with a good amount of paint and then gently dab the paint onto the acrylic. You can paint it on normally but it will smear and take a few more coats of paint to get a good solid colour. The paint also needs to dry between coats, if the base coat is still wet the next layer will drag and lift the wet first coat.
Keep turning the tag around and hold it up to the light, this helps show where you may have missed applying colour and what areas need a little more.
Finish painting the design. You can see how ugly the back looks, but don’t worry about that, none if it will be seen when it’s finished.
Once I have finished adding the colour I like to add a layer of White over everything, Some of the Fluid Acrylics are semi transparent, adding the white backing stops any shadowing that may been seen trough a transparent colour from the background.
This is the tag as seen from the front.
Heat emboss the Andy Skinner Industrial wings using the aged Ivory embossing powder.
Using the DecoArt Matte DecouPage glue apply a fair coating to some design paper stick it to the tag. I used a brayer and firmly rolled the back of the media board to make sure the paper stuck with no air bubbles.
Once dry trim the paper to fit with a craft knife and gently sand the paper edge at a 45 degree angle to get a nice smooth edge.
Glue the Industrial wings to the back of the tag. I used some super glue to make sure the embossed surface would stick.
Use a Cropodile and punch a couple of holes at the top of the wings, cut some chain to length and attach with some rings to act as the tag hanger.
The Acetate Tando uses is heat resistant, this means if you are careful you can get away with heat embossing.
I have used a distressed star stamp from Carabelle Studio and heat embossed using the Aged Ivory embossing enamel to tie in with the wings.
Finish off by adding some more embellishments, I have added some more chain to hang down behind the tag and I have added some little bells to the chain.
The enamel number was given a very very thin coat of DecoArt One Step crackle.
This left a little texture in places and misses in other areas so when black antiquing cream is added it leaves a different type of result

