Stitching the Past to the Present
Posted by DecoArt on May 16th 2018
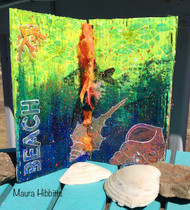
Now that the weather is finally turning to Spring where I live, we’ve been talking about fossil hunting and beaches. The Earth Science teacher in me starting pondering these ideas and a way to connect them. I started with the past, in the sense of, Geologic Past, so I wanted to create a murky and dark ocean image with fossils in it. The word I added, Drift, has ties to Continental Drift and the shifting of the plates of the Earth in the past that continues to present day. I used the Beach and shells and fish to represent today, and made this ocean scene much brighter. Finally, I stitched the past to the present with sari ribbon to bring the layers together.
Items Needed:
- DecoArt Media Misters - Yellow Green (DMM04-30)
- DecoArt Media Misters - Purple (DMM07-30)
- DecoArt Media Misters - Carbon Black (DMM08-30)
- DecoArt Media Mediums and Specialty Products - Modeling Paste - White (DMM21-71)
- DecoArt Media Misters - Shimmer Turquoise (DMM09-30)
- Andy Skinner Stencils 8x8 - Fossil (ANDY111-K)
- Americana Stencils 6x8 - Fenced In (ASMM43-K)
- Americana Decor Stencils - Ocean Life (ADS205-K)
- Andy Skinner Stamps (Fossils)
- Stampendous Quest Texture Cube
- Calligraphy Colors (Copper)
- Small Gel Plate
- Brayer
- Heat Tool
- Corrugated Cardboard (double Layered)
- Flat Brush
- Palette Knife
- Splatter Brush Or Toothbrush
- Water Brush
- Graphite Pencil
- White Paint Pen (fine)
- Cosmetic Sponge
- Ribbon
- Hole Punch
- Found Object - Hotel Shower Cap
- Plastic Card/Hotel Key Card
- Black Ink
Instructions:
Cut cardboard to size, 2 pieces at 6” x 10”. Tear off some of the outer covering on the cardboard.

Use a plastic card and scrape white gesso down from the top, and black gesso up from the bottom on all panels.


Brush Neon Thermal Green down from the top of the cardboard, and Electric Blue up from the bottom of all panels.

Use a palette knife with the Modeling Paste and stencils to add words and images to the panels. Be sure to thoroughly dry.


Paint Green Gold over the top paste areas, and Ultramarine Blue over the bottom areas. It’s fine if you get a bit in the surrounding area, or you can wipe it away with a baby wipe.

Use the Snake Skin stencil, a cosmetic sponge, and Cobalt Teal Hue to randomly sponge areas of the stencil to create a water effect. Do this on all panels.


Mix the White and Purple paint on the gel plate, and use a brayer to smooth it over the plate. Take a found image to create “faux fossils.” I used a hotel shower cap that I stapled together, pressed it into the paint, and transferred the image to my panels.


Brush on and wipe off in area Quinacridone Gold, Cerulean Blue, and Quinacridone Violet on the bottom section on the ammonite panels.


In the top sections of the ammonite panels, brush on and wipe off Hansa Yellow Medium and Cerulean Blue.


Rub Metallic Lustres over the raised images on the fossil panels.


Outline the Ammonite with a graphite pencil then blend with a water brush.

Lightly spray mists over the Ammonite panels.


Drip Copper ink down the fossil panels and wipe away as needed. Do this on paper to catch the drips. Then, lay the Beach panels down onto the paper and blot up the ink splats.

On the Beach panels, rub Neon Torrid Orange and Sizzling Pink onto the raised images and word. I just use my finger to do this. Use black archival ink to stamp the fish and splats onto these panels. Dilute the orange and pink with water and use a splatter brush or toothbrush to add drops onto the panels. Also use misters to do this, as well as the copper ink. When dry, outline with a white paint pen.

Punch holes into panels and thread sari ribbon through to connect the panels.


When I started working on this, my plan was to create two different ocean themes, but as I was working I noticed I had the fossils only on one side and the idea of stitching the past to the present emerged. I think it’s really interesting how our subconscious mind works in the background and leads us down new paths. Has that ever happened to you?
Maura

