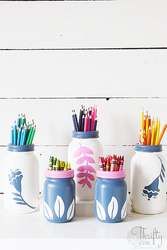
DIY Kids Craft Supply Organization
Posted by DecoArt on Aug 2nd 2018
At our house crayons, coloring pencils, markers and all things craft supplies are all the rage. I love that my kids are exploring their creativity, but I can't stand the mess and chaos! There's no better way to control said chaos than with a little organization in the form of mason jars decorated just for them!
These were so desperately needed in our home. The crayons are usually just placed in a small bin that then gets rummaged through which ultimately ends up all over the table or ground.
Items Needed:
- Americana Reusable Adhesive Stencil 10x10 - Fun Floral
- 3 Large Mason Jars
- 2 Small Mason Jars
- Foam And Stenciling Brushes
Instructions:

Americana Reusable Stick-On Stencil

I picked mason jars that had smooth glass.

Step 1: Using the foam brush, paint the larger mason jars White Birch and the smaller ones Night Sky. Wait an hour or so between coats. I ended up only needing to do 2 coats on these.

Also, paint 3 lid rims Night Sky and 2 of the rims Flamingo. Wait an hour or so between coats.

Step 2: I chose to cut up my stencil to make them easier to manipulate since the mason jars are smaller and round.

Step 3: It's time to stencil after the background paint has had time to dry fully, a couple of hours. I took off the plastic backing on the stencil I chose to use, in this case the flower, and placed the stencil onto the jar. I pressed down gently to make sure it adhered to the jar, especially where I would be painting.

Step 4: I used my stenciling brush and Night Sky for this flower. I first removed the excess paint by dabbing it onto a plate, and then gently applied the paint to the jar.

I used Flamingo on this jar with the Night Sky in the background using the same technique.

I used White Birch as the leaves on the front bottom of the smaller jars. If you mess up at all on the stencil, just grab a wet cotton swab and wipe it off.

Before the paint had time to dry, I pulled up the stencil and placed it on some wax paper so I could use them on the other jars. Once I finished with all the painting, I cleaned off my stencils using some mild soap and water. Since they are reusable, I can use them again for a different project!
Can I just say how much I love these reusable adhesive stencils? They work around non-flat objects the best! Plus, you get a good crisp line every time!
Here's the finished project.

To fit the pencils and crayons into the jars, I just placed some grocery bags into the bottom of each jar so they colors were easy to access.

My kids have loved these and how they now have easy access to all the colors without trying to find one at the bottom of the bin. I think I may need to make a few more now for all of their other craft supplies to keep this mommy sane!


