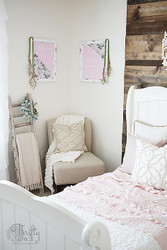
Shabby Chic Art For Little Girls Room
Posted by DecoArt on Jun 9th 2019
Two years ago we switched our daughter out of her crib and into a big girl bed. That's all that changed in her room. I didn't redecorate, I didn't add anything more. It's sat kind of like a half nursery half toddler room since then. I figured it's about time to add some bigger girl decor.
I love the look of shabby chic for girls bedrooms and wanted to add an inspirational quote for her.
Items Needed:
- Two Canvases (16x20)
- Two 8' 1x2 MDF Modling Pieces
- Sandpaper
- Miter Saw And Box
- Wood Glue/hot Glue
- Floral Cardstock
- White Cardstock
- Cutting Machine (to Cut Out Words)
- Wood Beads
- Jute
Instructions:

Step 1: Time to paint the canvases. I wanted a pretty soft pink for the main color, so I used about a 10:1 ratio of Titanium White and Quinacridone Magenta Americana Premium Acrylics.

I mixed them up to get my desired pink.

I then painted both canvases this color, avoiding the edges.

Step 2: Next is to paint and distress the frame. Paint both pieces of molding with one coat of Raw Umber. This coat doesn't have to have full coverage.

Step 3: Place a small amount of petroleum jelly on your finger and swipe the edges of the molding every so often. I also added some onto the middle of the molding. Keep in mind that everywhere you place the petroleum jelly will show the brown under the white. So use sparingly.

Step 4: Paint the molding pieces with Titanium White using two coats.

Step 5: Using a piece of sandpaper or a sanding block, gently scrape the white paint off the petroleum jelly. You shouldn't have to apply too much pressure, it'll come off easily.

Step 6: Using a miter saw or a saw and miter box, cut the molding to size. There are two pieces at 16" and two at 20" per canvas. The longest side of the piece should be this measure.
Step 7: Using wood glue or hot glue, adhere the molding to the canvas. I ended up using both methods, and both worked perfectly!

Step 8: Cut the quote out using your electronic cutter. The "You Are" is approximately 3" tall, the others are about 2". I played around with my fonts until I got the look I wanted. Here's what I used:
"For You" and "Powerful": Raleway
"Beautiful": Angellina
"Brilliant": Sansumi
"And Brave": Shorelines Script

Play with the placement of the letters until you got about where you want them.

Step 9: Measure where you want each word and draw a straight line. This is the line the bottom of the words will sit on. Draw it light, and in the next step, make sure you don't get Decou-Page on it, or else it won't erase.

Step 10: With a brush, add Americana Decou-Page to the back side of each letter and then put into place. Once adhered, erase your pencil lines. Now do two to three coats of Decou-Page on the top (making sure to wait 20 minutes between coats).

Step 11: Now to add a little pizzazz. Tear the floral cardstock piece in half. Try to make it somewhat diagonal from one corner to the other

Step 12: Adhere with the Decou-Page on the bottom first. Let dry, then apply two to three coats to the top.

Step 13: Just because I wanted to add a little more color and dimension, I decided to make a wooded garland. I strung the wood beads onto the jute, then used my stippling brush to apply the Green Gold. This took about two to three coats for somewhat full coverage.

I used several methods to paint these little balls, and this was the one that worked the best. To add the tassels, and finish off the garland, you can find the tutorial here.

I then hung the garland on the edge of each frame. To make sure they stay in place, you can add a dab of hot glue on the top.

Here are the complete pieces. I really just love this quote: You are powerful, beautiful, brilliant and brave. Something that every girl, little or old, needs to hear.


